- Bending Technical Guide
- How to Use and Select Tools (2) Acute & Hemming
How to Use and Select Tools (2) Acute & Hemming
Hemming
Purpose of the product edge hemming
① Safer ② Strengthen ③ Appearance
Features
① Acute angle bend by 1st process and hemming in 2nd operation
② Higher tonnage required
③ Two types: tool change type and double-deck type
Hemming Tool
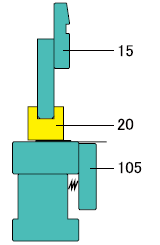
① Tool Change Type
| Tool Structure | Features |
|---|---|
| Two Process Type | Hemming suitable to 2.0-5.0mm thickness is performed in 2 steps with 2 tool changes |
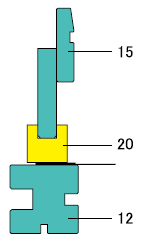
② Double-Deck Type
| Tool Structure | Features |
|---|---|
| Double-Deck Type | No tool-change makes the production-flow smooth because of only one
tool-set-up. Depth adjustment is required during the process from acute bend to hemming process. |
Tool list for acute angle bend by thickness
| 0.4 - 2.0 | 2.3 - 3.2 | 4.0 - 5.0 | |
|---|---|---|---|
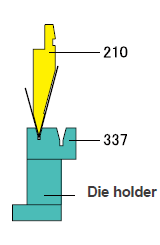
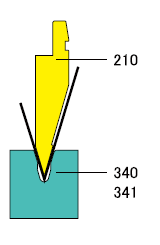
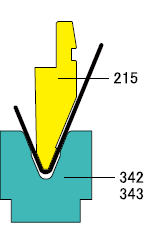
| Punch Angle | 30° | 30° | 45° |
| Applicable Tool | No.210 | No.210 | No.215 (Edge 3mm Flat Punch) |
| Die V Angle | 30° | 30° | 45° |
| Applicable Die | No.337 | No.340 No.341 |
No.342 No.343 |
Tool Combination Chart for Hemming Work
1st process
| 1 Acute Bend 0.4 - 2.0mm |
2 Acute Bend 2.3 - 3.2mm |
3 Acute Bend 4 - 5mm |
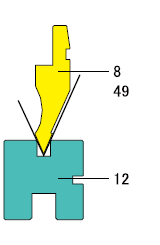
4 Acute Bend 0.4 - 2.3mm |
|---|---|---|---|
 |
 |
 |
 |
2st process
| 5 Hemming 0.4-2.0mm |
6 Hemming 0.4- 3.2mm |
7 Hemming 0.4 - 3.2mm |
8 Hemming 0.4-3.2mm |
|---|---|---|---|
 |
 |
 |
 |
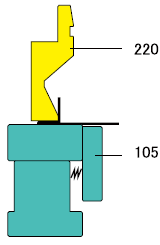
Note 1 Use slider hemming tool for more than 2.0mm hemming.
Note 2 Use heavy spacer instead of distance piece for application below.
- (1)SPCC more than 4.5mm thick
- (2)SUS304 thicker than 2.5mm
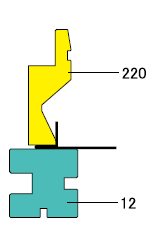
Note 3 Use #220 punch for Flanged hemming shown 6.
Note 4 Die block is required by the press brake.
Pressure Applied Point Movement in Hemming Process
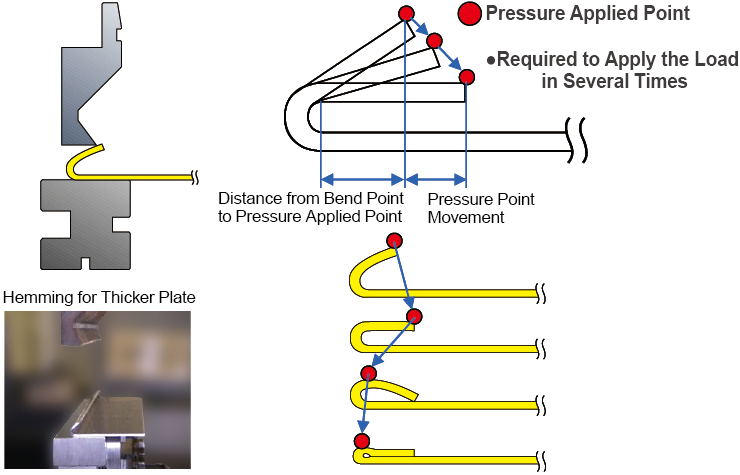
- In the hemming process the pressure point is set at longer distance to prevent the material from slipping off.
- The longer the distance of pressure point the more thrust force occurs.
- Thicker material requires more strokes to flatten the acute bend.
Caution for Hemming Operation
- Hemming operation should be performed after 30° bend was completed by use of 30 ° punch. The hemming process needs the special care for the work. The work will slide toward the operator side. To avoid this slide of the work, apply the small pressure to the work and apply more pressure gradually to the work and finally apply the sufficient pressure to the work so that the thrust force can be minimized and avoid the unnecessary load to the machine and tooling.
- In the hemming process, be sure to set tool #220 in front side when hemming work is carried by #220. (Rear side installation is Prohibited.)
- Alter the data (D-value ) while the pressure applied point is moved. And the hemming process must be done in slower speed by switching to "slow-down mode". And apply the load through the tool center at each pressure point.
Refer the picture show below for tool center and pressure points.
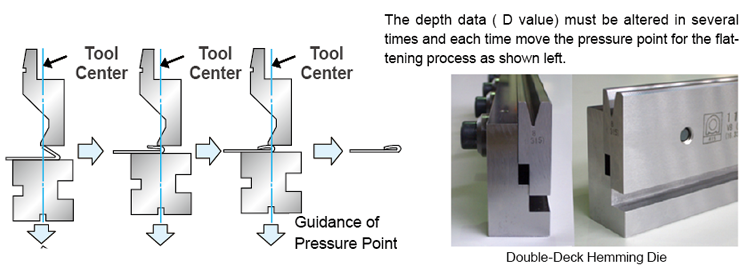
4. For the hemming work, the depth data (D-value) are
different in the acute angle bend and in the hemming process.
Apply proper depth data for both process.